How to Make Histogram or Heatmap in PyGWalker
Updated on

Introduction to Histograms & Heatmaps
Histograms
A histogram is a graph that shows how numerical data is distributed. Values are grouped into buckets (also known as bins) and the number of values that fit into each bucket is then counted.
Histograms graph the buckets rather than the actual values. Every bar symbolizes a bucket, and the height of the bar indicates the frequency (count, for example) of values falling within the interval of that bucket.
Heatmaps
A heatmap is like a histogram, but over time, where each time slice represents its own histogram. Instead of using bar height as a representation of frequency, it uses cells, and colors the cell proportional to the number of values in the bucket.
Heatmaps are a fantastic tool for data visualization because they efficiently convey complicated information in a way that is simple to comprehend.
How to Make Histogram & Heatmap in PyGWalker
Creating a Histogram in PyGWalker
You can create a histogram following these steps in PyGWalker:
-
Import your data.
-
Click the dropdown icon of the field in the measure segment. Select "New calculation". There will be some transformations you can make. Click the bin transformation option. And it creates a new field bin (your field name) in dimension segment.
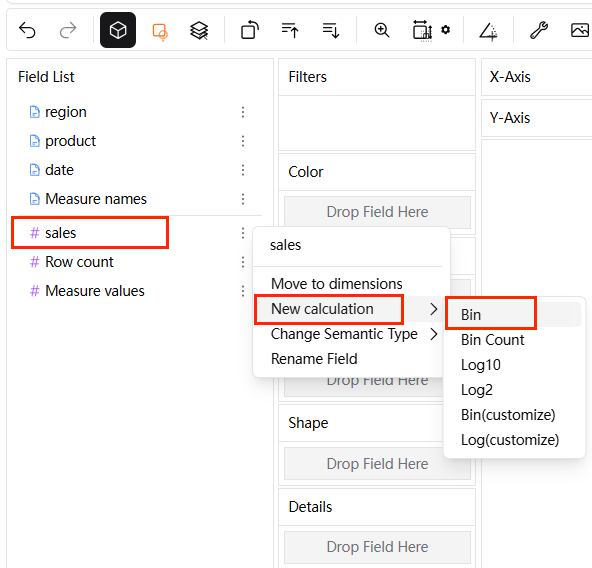
-
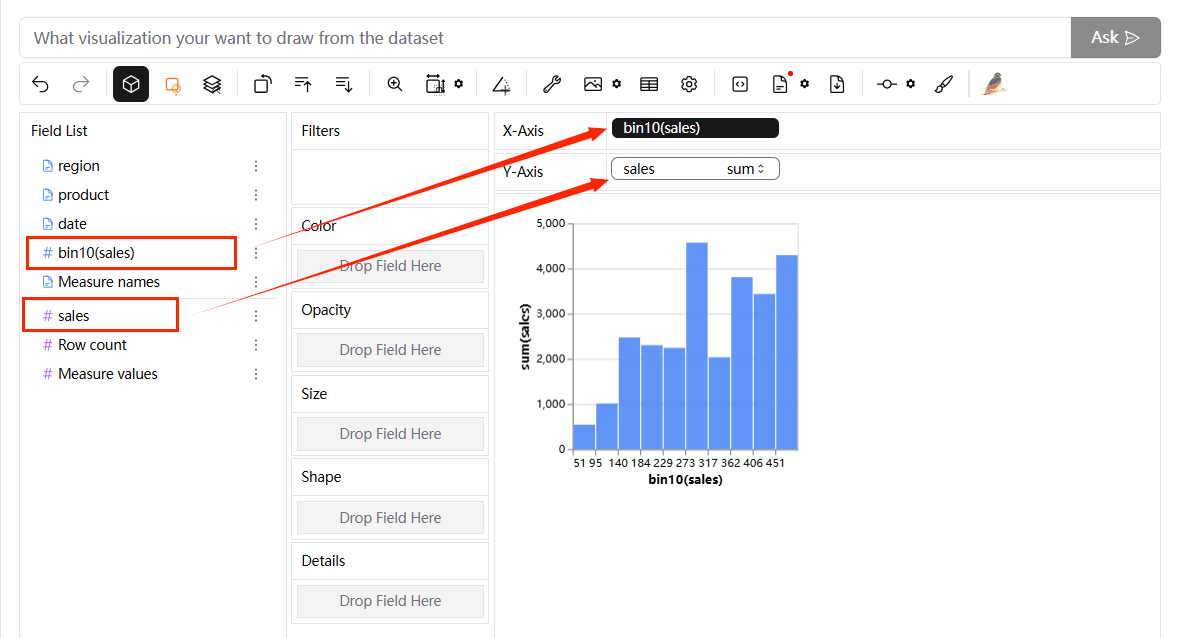
Use "bin(your field name)" as the x-axis and **"row count"**as the y-axis and you can get a histogram.
Creating a Heatmap in PyGWalker
You can create a heatmap following these steps in PyGWalker:
-
Import your data.
-
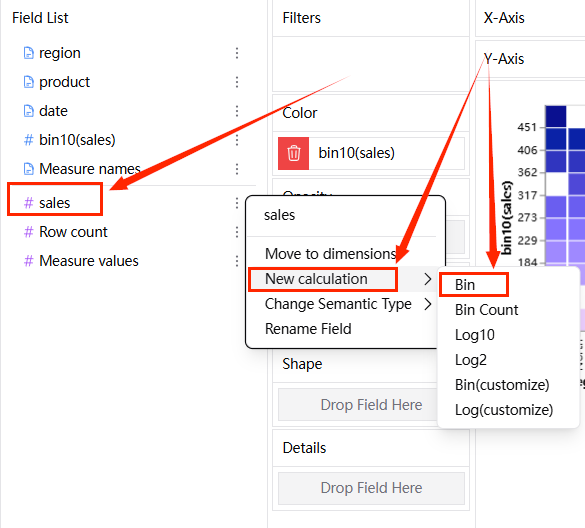
Select the chart type: Click the "mark type" button on the Tools bar and select 'Rectangle'.
-
Convert the variable: Left-click on your variable, and a menu will pop up. Choose the "New calculation" option. There will be some transformations you can make. Click the bin transformation option. And it creates a new field bin (your field name) in dimension segment.
-
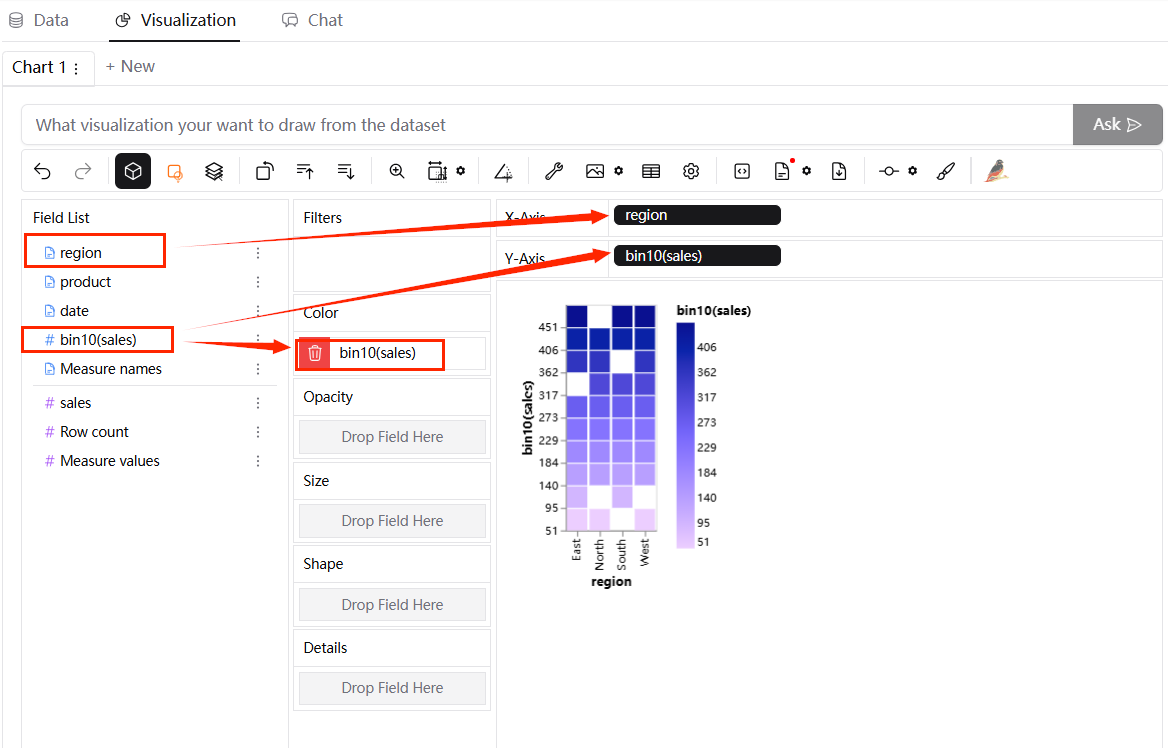
Create the chart: Drag and drop your variables onto the x-axis, y-axis, and color shelves for your heatmap.
Best Practices for Using a Histogram & Heatmap
Histogram
Use a Zero-valued Baseline
An important aspect of histograms is that they must be plotted with a zero-valued baseline. Since the frequency of data in each bin is implied by the height of each bar, changing the baseline or introducing a gap in the scale will skew the perception of the distribution of data.
Choose Interpretable Bin Boundaries
As a general rule, bin sizes of 1, 2, 2.5, 4, or 5 (which divide 5, 10, and 20 equally) or their powers of ten are appropriate places to start. In addition, bins with sizes 3, 7, or 9 will probably be harder to read, so you shouldn't utilize them unless the situation calls for them.
Heatmap
Choose an Appropriate Color Palette
Color is a core component of heatmap, so make sure that you choose a suitable color palette to match the data. Most frequently, there will be a sequential color ramp between value and color, where lighter colors correspond to smaller values and darker colors to larger values, or vice versa.
Include a Legend
Typically, a heatmap needs a legend that explains how different colors relate to different numbers. A heatmap's values cannot be understood by viewers without a key because color and value are not intrinsically related. A legend is not necessary when the only things that are important are the relative patterns of the data that are shown, not the precise relationship between value and color.
Conclusion
By understanding the basics of heatmaps & histograms and using these design tips, you can create effective and intuitive heatmaps & histograms in PyGWalker. Enjoy your data visualization journey.