How to Use OpenCode: Install, Configure, Oh My OpenCode, and Common Traps

OpenCode is an open-source AI coding agent you can run from the terminal, desktop app, or IDE extension. The fastest reliable setup is: install OpenCode, connect a provider, run /init to create AGENTS.md, start in plan, and only then move to build for edits.
If you searched for OpenCode tips, how to use OpenCode, or Oh My OpenCode, the important distinction is simple: OpenCode is the base coding agent. Oh My OpenCode is a separate orchestration harness people add on top when they want stronger multi-model routing and more aggressive task completion. Do not start with the harness until plain OpenCode works in your repo.
If you want broader context first, start with the AI Coding topic hub, How to Use Codex, and Parallel Code Agents Explained. If you are comparing agent frameworks at a higher level, OpenClaw vs ZeroClaw vs Pi Agent vs Nanobot is the better comparison page.
- Runcell Science: An Open Source Alternative to Claude Science for Research Workflows
- How to Make Mac Not Sleep: Keep Codex, Claude Code, and AI Agents Running
- OpenClaw vs ZeroClaw vs Pi Agent vs Nanobot: Which AI Agent Stack Should You Choose in 2026?
- Can Claude Code Analyze Jupyter Notebooks for Data Science? What It Actually Does
- Claude Code Routines: Why AI Agent Cron Jobs Matter
- Claude Code Desktop Bypass Permissions: How to Enable It
- How to Build Two Python Agents with Google’s A2A Protocol - Step by Step Tutorial
- Top 10 growing data visualization libraries in Python in 2025
Quick answer: how should you use OpenCode?
| Goal | Do this first | Why |
|---|---|---|
| Install OpenCode | Run the official install script from opencode.ai | This is the fastest documented quick-start path |
| Use npm instead | npm install -g opencode-ai | Useful when your team standardizes Node tooling |
| Start a project | Run opencode, then /init | /init creates or improves AGENTS.md for the repo |
| Explore safely | Switch to plan | It keeps repo analysis read-only before edits |
| Make changes | Switch to build | Use it after the plan and scope are clear |
| Repeat workflows | Add .opencode/commands/*.md | Custom commands are better than retyping prompts |
| Add orchestration | Install Oh My OpenCode later | It is useful after the baseline OpenCode loop is stable |
The practical recommendation is still conservative: learn plain OpenCode first, write a useful AGENTS.md, add one or two custom commands, then decide whether Oh My OpenCode is worth the extra moving parts.
OpenCode already covers the core loop most developers need: understand the codebase, plan the change, edit safely, and work from a terminal-first interface. The pairing with Oh My OpenCode is useful, but it is not the first step.
OpenCode vs Oh My OpenCode vs Oh My OpenAgent
This naming causes avoidable setup mistakes, especially because older tutorials still rank.
| Name you see | What it means | What to do |
|---|---|---|
| OpenCode | The base open-source coding agent | Install from opencode.ai or a current package manager path |
| Oh My OpenCode | A separate orchestration harness around OpenCode | Use it only after plain OpenCode works |
| Oh My OpenAgent | Older repo/project naming tied to the same harness lineage | Treat old install snippets with caution and verify the current command |
| OpenClaw | A different agent/project ecosystem | Do not use OpenClaw instructions to install OpenCode |
If a tutorial tells you to run a raw GitHub install script from an old code-yeongyu/oh-my-openagent path, pause and verify the current project instructions first. Many search results mix OpenCode, Oh My OpenCode, Oh My OpenAgent, and OpenClaw.
What OpenCode actually is
OpenCode is an open-source AI coding agent built around a terminal-first workflow. Official docs describe it as:
- a TUI-first coding agent
- a desktop app in beta
- an IDE extension
- a provider-agnostic system that can work with OpenAI, Anthropic, Google, and other model backends
- a toolchain with built-in agents, permissions, custom commands, rules, formatting, snapshots, MCP servers, and LSP support
The important mindset shift is this: OpenCode is not just a chat window with code generation. It is an agent workflow surface. You can use it to:
- inspect unfamiliar repos
- plan a change without editing
- edit files and run shell commands
- create project rules with
AGENTS.md - define repeatable slash commands in
.opencode/commands/ - tighten or relax permissions based on repo risk
One practical detail matters because older tutorials are already stale. As of April 28, 2026, the safe install target is the official OpenCode documentation and current package paths, not old raw GitHub install snippets. If a guide mentions OpenAgent, OpenClaw, or an archived repo, treat it as historical context until you verify the current OpenCode command.
Getting started with OpenCode
1. Install OpenCode
The official quick start is:
curl -fsSL https://opencode.ai/install | bashYou can also install it through package managers. The most common alternatives are:
npm install -g opencode-ai
brew install anomalyco/tap/opencode
On Windows, use WSL if you want the smoothest terminal-agent experience. Scoop, Chocolatey, and npm are also documented install paths, but WSL avoids many path and shell compatibility issues.
2. Fix stale tutorial commands before debugging OpenCode itself
If your error came from an old blog post, check the command source before you debug your shell.
| Symptom | Likely cause | Fix |
|---|---|---|
opencode is not found | OpenCode was not installed on your current shell path | Reopen the terminal, check the package manager path, or reinstall from the official command |
| A raw GitHub installer fails | The guide points at an older Oh My OpenAgent path | Verify the current Oh My OpenCode instructions before running the script |
bunx oh-my-opencode install fails | Bun, package cache, or the harness installer is the issue | Confirm plain opencode works first, then debug the harness |
| OpenCode opens but edits too aggressively | Permissions are too loose for a new repo | Set edit and bash to ask in config |
3. Connect a provider and open a real project
After launch, the official docs recommend using:
/connectThen select opencode in the TUI and complete auth at opencode.ai/auth, or configure another provider you already use.
The practical rule is simple: do not begin with the biggest repo and the vaguest request. Open a project you actually know well enough to review.
4. Run /init before you ask for serious work
OpenCode can generate an AGENTS.md file for the repo:
/initThat gives the agent durable project instructions. Commit the file to Git. This is one of the highest-leverage steps in the entire workflow because it reduces repeated prompt boilerplate and makes behavior more stable across sessions.
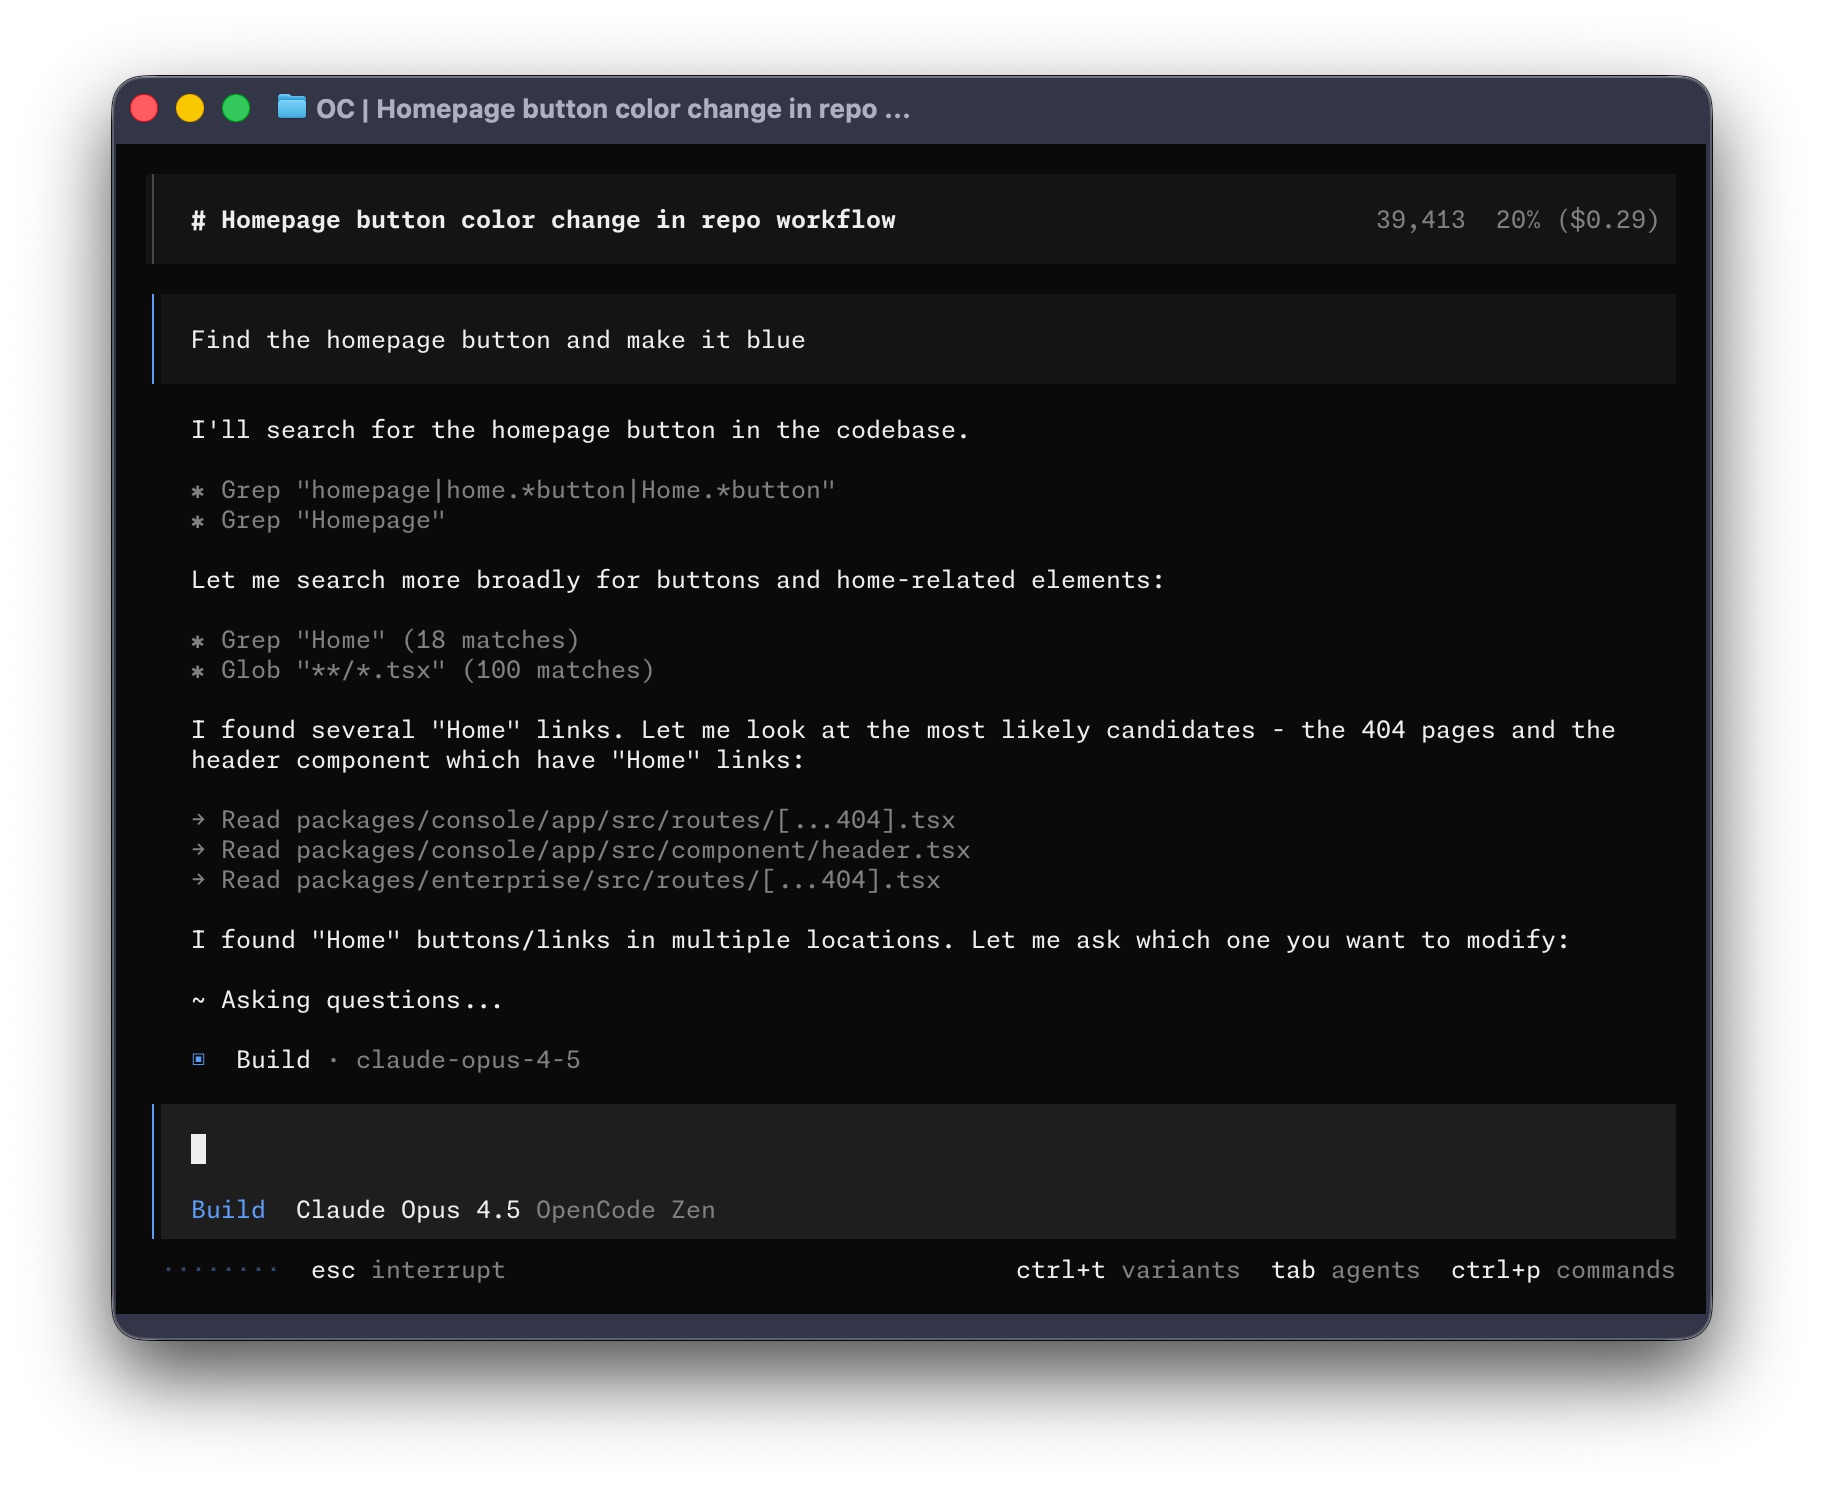
5. Start in plan, not build
OpenCode ships with two built-in agents you can switch between with Tab:
buildfor full development workplanfor analysis and code exploration
For your first task, use plan and keep it narrow:
Summarize this repository's build, test, and release flow.
Point out the main application entrypoints.
Do not edit anything yet.
Then switch to build only after the repo map sounds correct.
7 practical OpenCode tips
Tip 1: use plan mode as your default for unfamiliar codebases
The official docs are right to separate planning from editing. This is not just a safety feature. It improves quality.
If you drop straight into build, the model may begin changing files before you have validated its understanding. If you begin with plan, you get one cheap turn to confirm architecture, naming, test flow, and likely blast radius.
Use prompts like:
Explain how auth works in @src/auth/index.ts
Then propose two minimal fix options.
Do not edit yet.
The @ file reference is especially useful because OpenCode supports fuzzy file search directly in the prompt.
Tip 2: treat /init and AGENTS.md as force multipliers, not setup trivia
Many developers underrate this step because it looks like documentation overhead.
It is not. AGENTS.md is where you should put:
- build, test, and lint commands
- repo structure and package boundaries
- style rules and review expectations
- "never touch this" constraints
- definition of done
If you skip this and keep repeating repo rules in chat, your results get noisier and more expensive.
If this topic interests you, Build a Claude-Code-Like AI Agent with Claude Agent SDK is a useful companion because it makes the same point from the agent-building side.
Tip 3: tighten permissions before you trust the defaults
OpenCode is configurable, and the official permissions docs make this explicit: you can set actions to allow, ask, or deny.
For new repos, a practical starter policy is:
{
  "$schema": "https://opencode.ai/config.json",
  "permission": {
    "edit": "ask",
    "bash": "ask"
  }
}
This slows the agent down slightly, but it prevents avoidable surprises while you are learning its behavior. Once trust is established, you can selectively loosen approvals for low-risk commands and routine edits.
Tip 4: create a few custom slash commands before you install more tooling
OpenCode already supports built-in commands like /init, /undo, /redo, /share, and /help. It also lets you add custom commands through config or markdown files in .opencode/commands/.
That means a lot of "advanced workflow" wins do not require a new framework yet. You can define commands like:
/test/review/ship-check/seo-page
For example:
---
description: Run tests related to the current change
agent: build
---

Run the relevant tests for the files touched in this session.
Summarize failures first, then propose the smallest credible fix.
This keeps common prompts short and reviewable.
Tip 5: use one provider well before you chase every provider
OpenCode's provider-agnostic model is a strength, but it can tempt people into premature setup sprawl.
Do not start by wiring five providers, three fallback chains, and a custom model matrix. Start with the provider you already pay for and understand. Then expand only after you know what OpenCode itself feels like.
If you are brand new to the category, How to Use Codex is worth reading alongside this page because it teaches the same operational lesson from a different product direction: constrained tasks beat tool sprawl.
Tip 6: know when terminal, desktop, and IDE each win
OpenCode is now bigger than a single terminal binary.
Use the terminal when you want the fastest prompt-edit-test loop.
Use the desktop app when review visibility, session management, and UI comfort matter more than raw speed.
Use the IDE extension when your existing editor is already the control surface and you do not want to context-switch.
The mistake is not picking the wrong one forever. The mistake is using the wrong one for the current job and then blaming the agent.
Tip 7: let OpenCode format and structure the change, but still review the diff like an engineer
Official OpenCode docs note that it can automatically use language-specific formatters after file edits. That is helpful, but formatter support is not the same thing as change quality.
You still need to review:
- whether the implementation actually matches the requirement
- whether the bash commands it wants to run are appropriate
- whether the
AGENTS.mdguidance is being followed - whether the patch is too broad for the task
AI coding agents reduce typing. They do not remove the need for engineering judgment.
OpenCode tips for real projects
These are the long-tail use cases where OpenCode tends to beat a generic chat window.
| Task | Good OpenCode prompt | Why it works |
|---|---|---|
| Understand a repo | Summarize the app entrypoints, package boundaries, and test commands. Do not edit. | Keeps the first pass read-only |
| Debug a failing command | Explain this error, identify the smallest likely fix, then wait before editing. | Separates diagnosis from mutation |
| Review a risky file | Review @src/payments/checkout.ts for bugs and security issues. Do not edit. | Uses file targeting without broad repo churn |
| Create a repeatable check | Add .opencode/commands/review.md | Keeps the review prompt stable across sessions |
| Work in notebooks | Ask it to inspect notebook-adjacent Python files, exports, or scripts first | OpenCode can help with repo code, but notebook state still needs human verification |
Can you use OpenCode with Jupyter notebooks?
Yes, but the safest workflow is not "let the agent rewrite a notebook blindly." Use OpenCode for the parts that behave like normal repo work:
- inspect Python modules imported by the notebook
- refactor helper functions
- generate or repair scripts that export notebook outputs
- review
.ipynbdiffs carefully before accepting them - ask for a cell-by-cell change plan before editing notebook JSON
Notebook work has a different feedback loop from application code. Passing tests is useful, but you still need to verify cell outputs, variables, plots, and data assumptions. If most of your work is notebook-native data analysis, Jupyter AI RunCell for Notebook Debugging and Data Work is the more focused companion guide.
When to add Oh My OpenCode
Oh My OpenCode is not OpenCode itself. It is a more opinionated orchestration layer built around OpenCode.
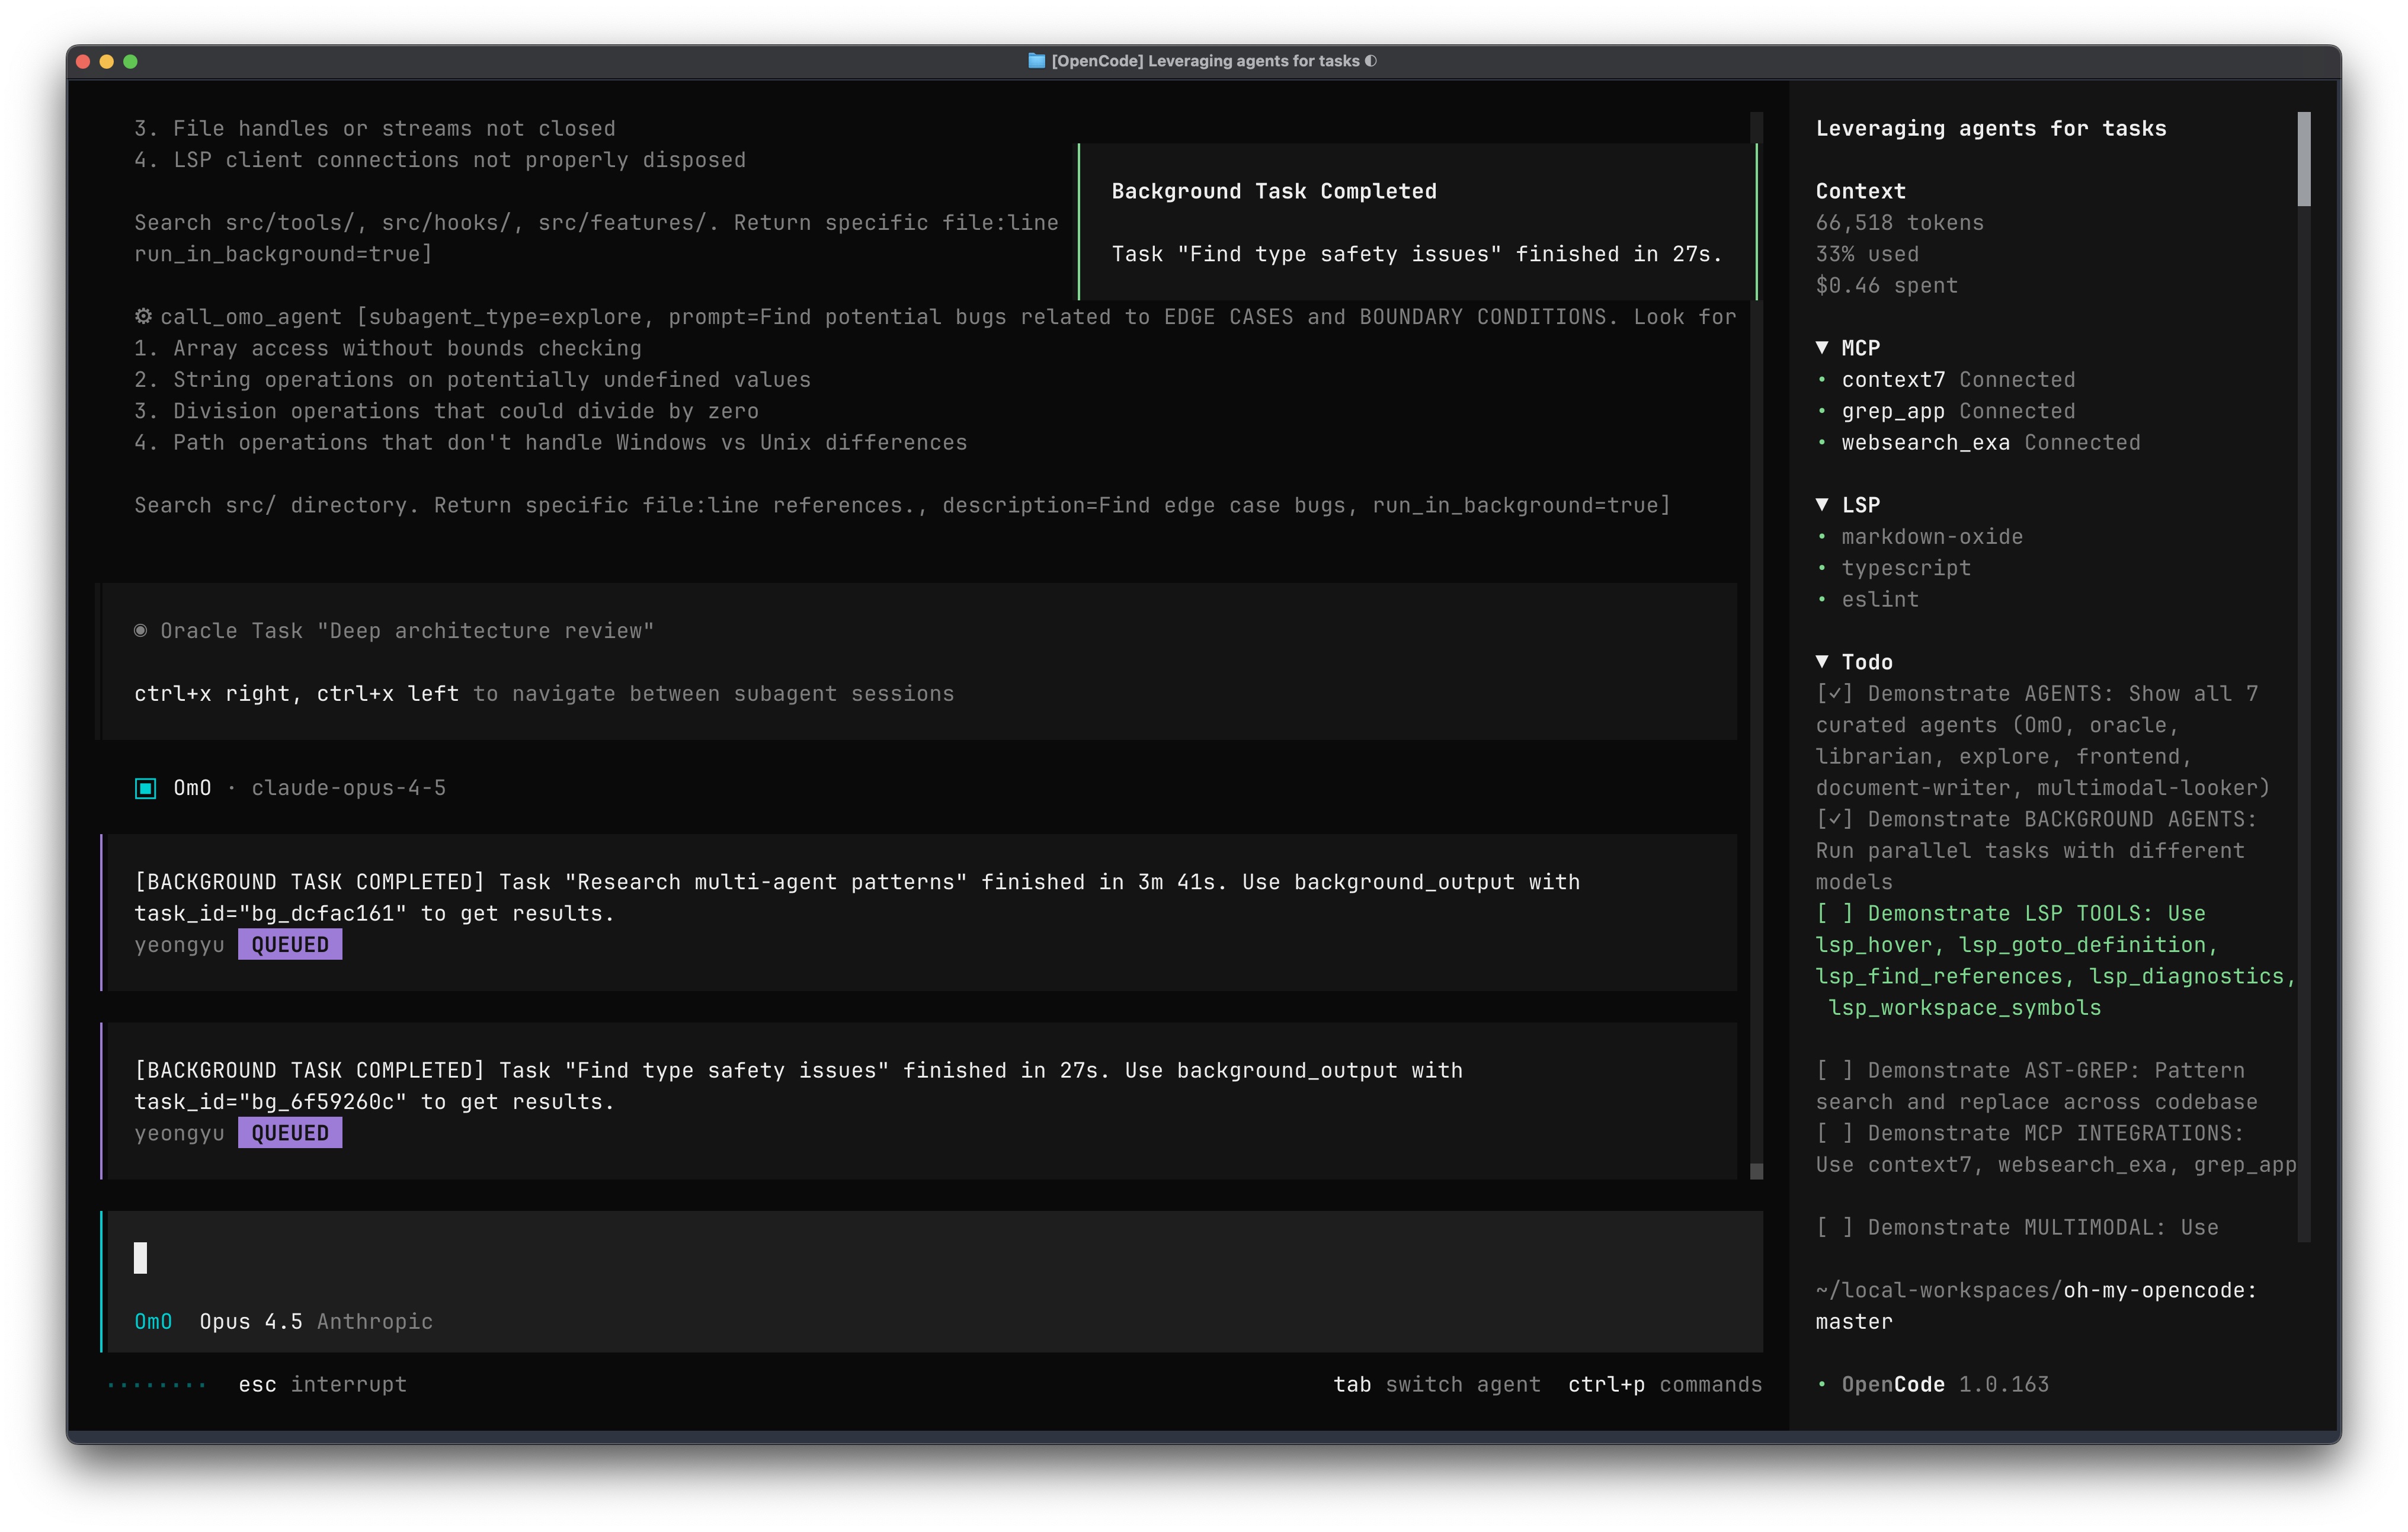
The current project docs and README describe it as a multi-model harness that adds:
- a stronger orchestration model around specialist agents
- category-based model routing
- background agents and parallel work
- built-in MCP-oriented workflows
- a more aggressive "keep going until the task is done" operating style
- commands like
ultrawork/ulw
That makes the pairing attractive when plain OpenCode starts to feel too lightweight for the work you are doing.
The appeal of Oh My OpenCode is not that OpenCode is weak. It is that some users want a more opinionated harness: more delegation, more orchestration, more model specialization, and less manual steering once the task begins.
How to pair OpenCode with Oh My OpenCode
1. Get plain OpenCode working first
Do not install a harness on top of a base tool you have not even tested.
Before you add anything, make sure you can:
- install OpenCode
- authenticate a provider
- run
/init - complete one
plantask - complete one
buildtask
If that baseline is shaky, adding Oh My OpenCode will only make debugging harder.
2. Know the naming before you install
There is a naming detail that can confuse people:
- some older references point to
code-yeongyu/oh-my-openagent - the branding people search for is usually Oh My OpenCode
- the install command many guides mention is
oh-my-opencode
Treat those as project-lineage clues, not as permission to run stale commands. Verify the current harness instructions before installing.
3. Install the harness with the official installer
The simplest manual path is:
bunx oh-my-opencode installThe project also explicitly encourages using an AI agent to fetch and follow the installation guide for you, which fits its own workflow philosophy.
4. Start with one high-value command, not the full feature list
The flagship habit is:
ultraworkor the short alias:
ulwThat is useful, but do not treat it like magic. First use it on a medium-sized task with a clear done state. Good fits include:
- fixing a contained bug plus related tests
- implementing one scoped feature
- cleaning up a noisy file cluster
- doing parallel research plus implementation in a repo you already understand
Bad first fits:
- vague greenfield architecture
- a production migration with no rollback plan
- a sensitive repo with no reviewed permission policy
5. Expect the best experience when you actually benefit from multi-model orchestration
Oh My OpenCode becomes more defensible when your work genuinely benefits from:
- different models for planning, reasoning, and frontend work
- background specialists
- broader MCP usage
- stronger subagent discipline
If your daily work is mostly "small fix in one file, run tests, move on," plain OpenCode is often enough.
OpenCode alone vs OpenCode plus Oh My OpenCode
| Question | OpenCode alone | OpenCode + Oh My OpenCode |
|---|---|---|
| Best first-time experience | Stronger | Weaker, because there is more to understand |
| Repo exploration | Strong | Stronger for deeper orchestration |
| Small daily tasks | Usually enough | Often overkill |
| Multi-model routing | Basic provider flexibility | Much more opinionated and central |
| Background specialists | Limited compared with harness workflows | Core part of the value proposition |
| Need for setup discipline | Moderate | High |
The practical recommendation is boring but correct:
- Learn plain OpenCode.
- Write and commit a real
AGENTS.md. - Add 2 to 3 custom commands.
- Tighten permissions.
- Only then decide whether your workload justifies Oh My OpenCode.
Common traps
Mixing up OpenCode and OpenClaw
These are not the same project.
If you searched for OpenClaw but want the open-source terminal coding agent with plan, build, /init, and Oh My OpenCode compatibility, you almost certainly mean OpenCode.
Using stale repo links
There is already enough repo churn around older OpenCode references that you should sanity-check the install path before following a random tutorial. Use the official docs first.
Confusing Oh My OpenAgent with Oh My OpenCode
Many old snippets still mention Oh My OpenAgent. That does not mean you should paste the first raw GitHub command you find. Check whether the article is talking about the base OpenCode agent, the Oh My OpenCode harness, or an older repo name.
Debugging the harness before OpenCode works
If bunx oh-my-opencode install fails, first confirm that opencode itself launches, authenticates, and can run /init in a small project. Otherwise you are debugging two layers at once.
Letting OpenCode rewrite notebooks without review
OpenCode can help with notebook-related code, but .ipynb files are JSON documents with execution state. Review notebook diffs and outputs instead of treating the patch like a normal TypeScript or Python source file.
Installing the harness before learning the baseline
If you do not understand how plain OpenCode behaves, you cannot tell whether a weird outcome came from the base agent, the harness, the model provider, or your repo rules.
Overbuying subscriptions on day one
Provider flexibility is valuable, but most users should start with the model access they already have.
FAQ
Is OpenCode the same as OpenClaw?
No. They are different projects. This guide is about OpenCode, the open-source AI coding agent documented at opencode.ai.
Do I need Oh My OpenCode to use OpenCode well?
No. OpenCode is already useful on its own. Oh My OpenCode becomes attractive when you want heavier orchestration, more opinionated delegation, and a broader multi-model workflow.
What should I do first after installation?
Run /connect, open a real project, run /init, switch to plan, and ask for a repo summary before you request edits.
Why do some OpenCode tutorials mention Oh My OpenAgent?
Some older guides use OpenAgent naming for the harness now commonly searched as Oh My OpenCode. Verify the current install path and do not mix those instructions with the base OpenCode install command.
Can OpenCode work with Jupyter notebooks?
Yes, but use it carefully. It is better for inspecting helper modules, scripts, and notebook-adjacent code than blindly rewriting .ipynb JSON. Ask for a change plan and review outputs after edits.
How do I fix opencode not found?
First reopen your terminal and check whether your install directory is on PATH. If you installed through npm, Homebrew, Scoop, Chocolatey, or WSL, verify that the command is available in the same shell where you are running OpenCode.
Should I start with terminal, desktop, or IDE?
Start with the terminal unless you already know you prefer review-heavy desktop workflows or editor-native workflows.
What is the simplest sign that I am ready for Oh My OpenCode?
You already use OpenCode comfortably, your AGENTS.md is real, and you repeatedly wish one agent could orchestrate multiple specialist passes for you.
Related Guides
- AI Coding Topic Hub
- How to Use Codex
- Parallel Code Agents Explained
- Build a Claude-Code-Like AI Agent with Claude Agent SDK
- OpenClaw vs ZeroClaw vs Pi Agent vs Nanobot